

Release mini programs
Super apps and merchants can release a mini program to one or more super apps to make it available to app users. This topic guides the super app and the merchant through the mini-program release process.
Overall workflow
Merchant release workflow
The following figure illustrates how merchants release a mini program to the super app:
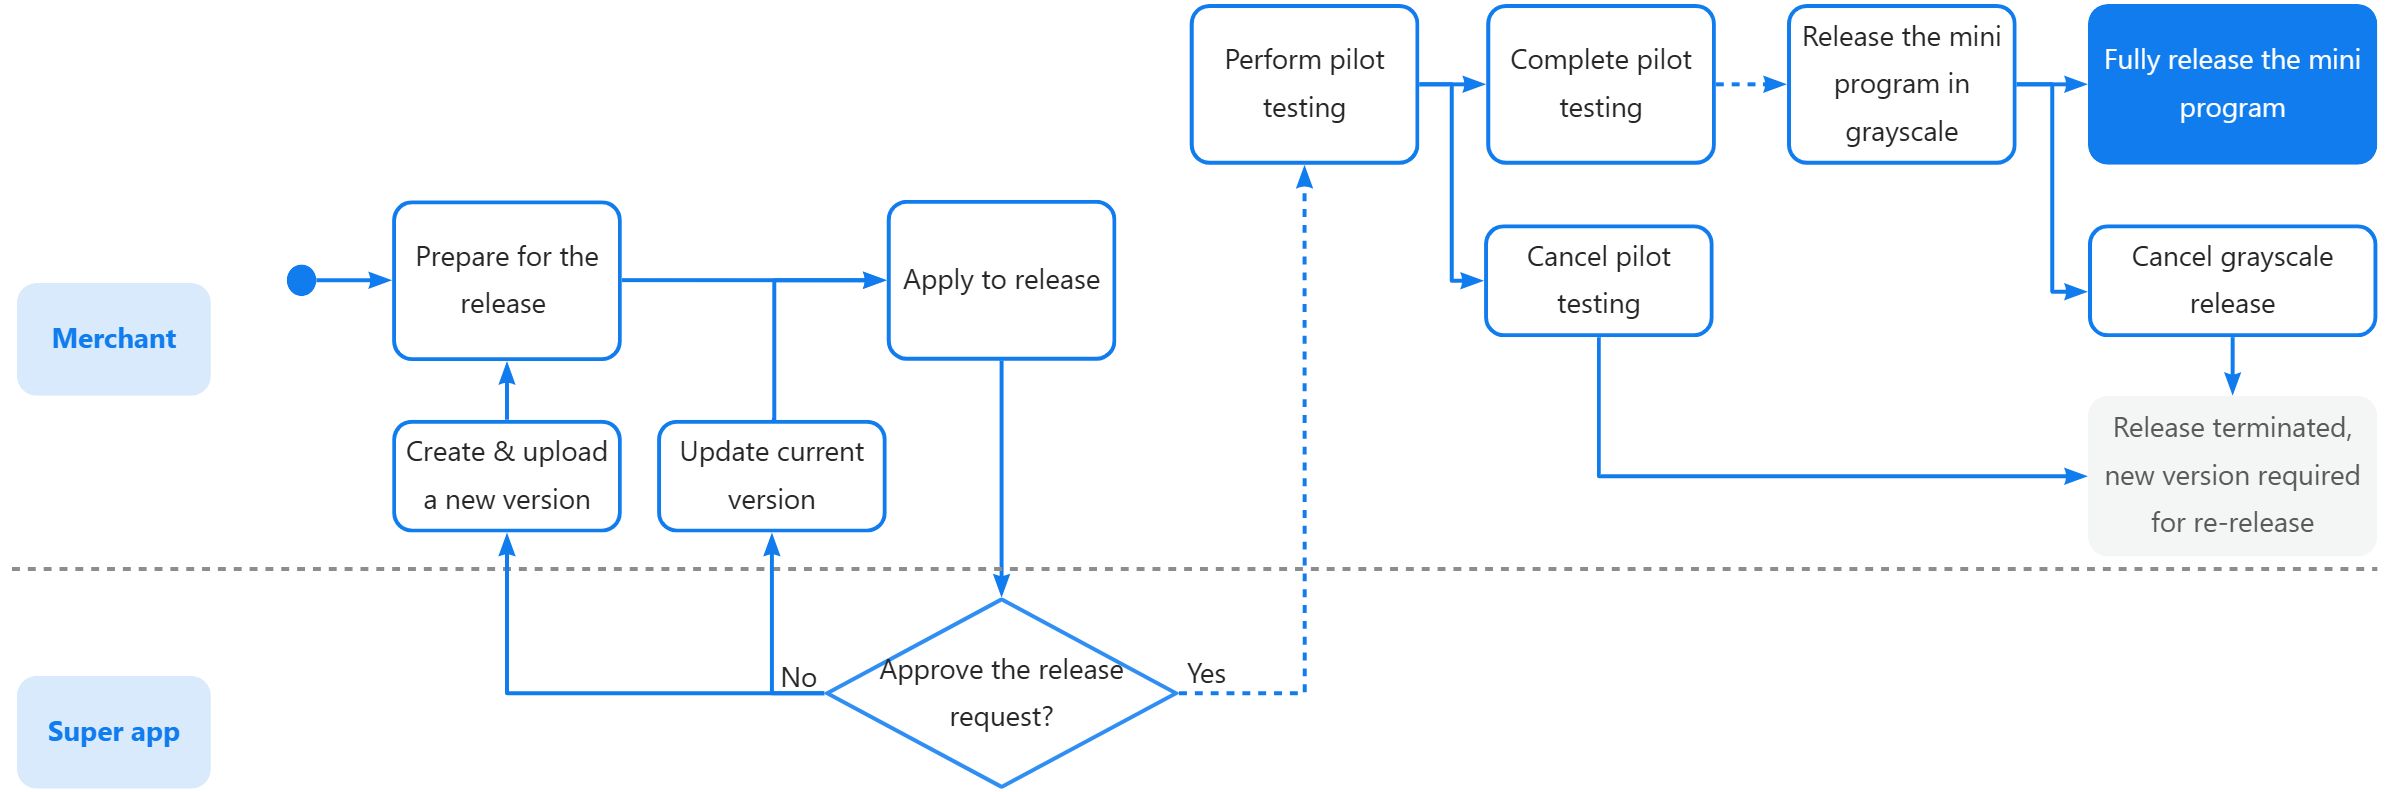
Mini-program release workflow for merchants
Super app release workflow
The following figure illustrates how the super app releases a mini program:
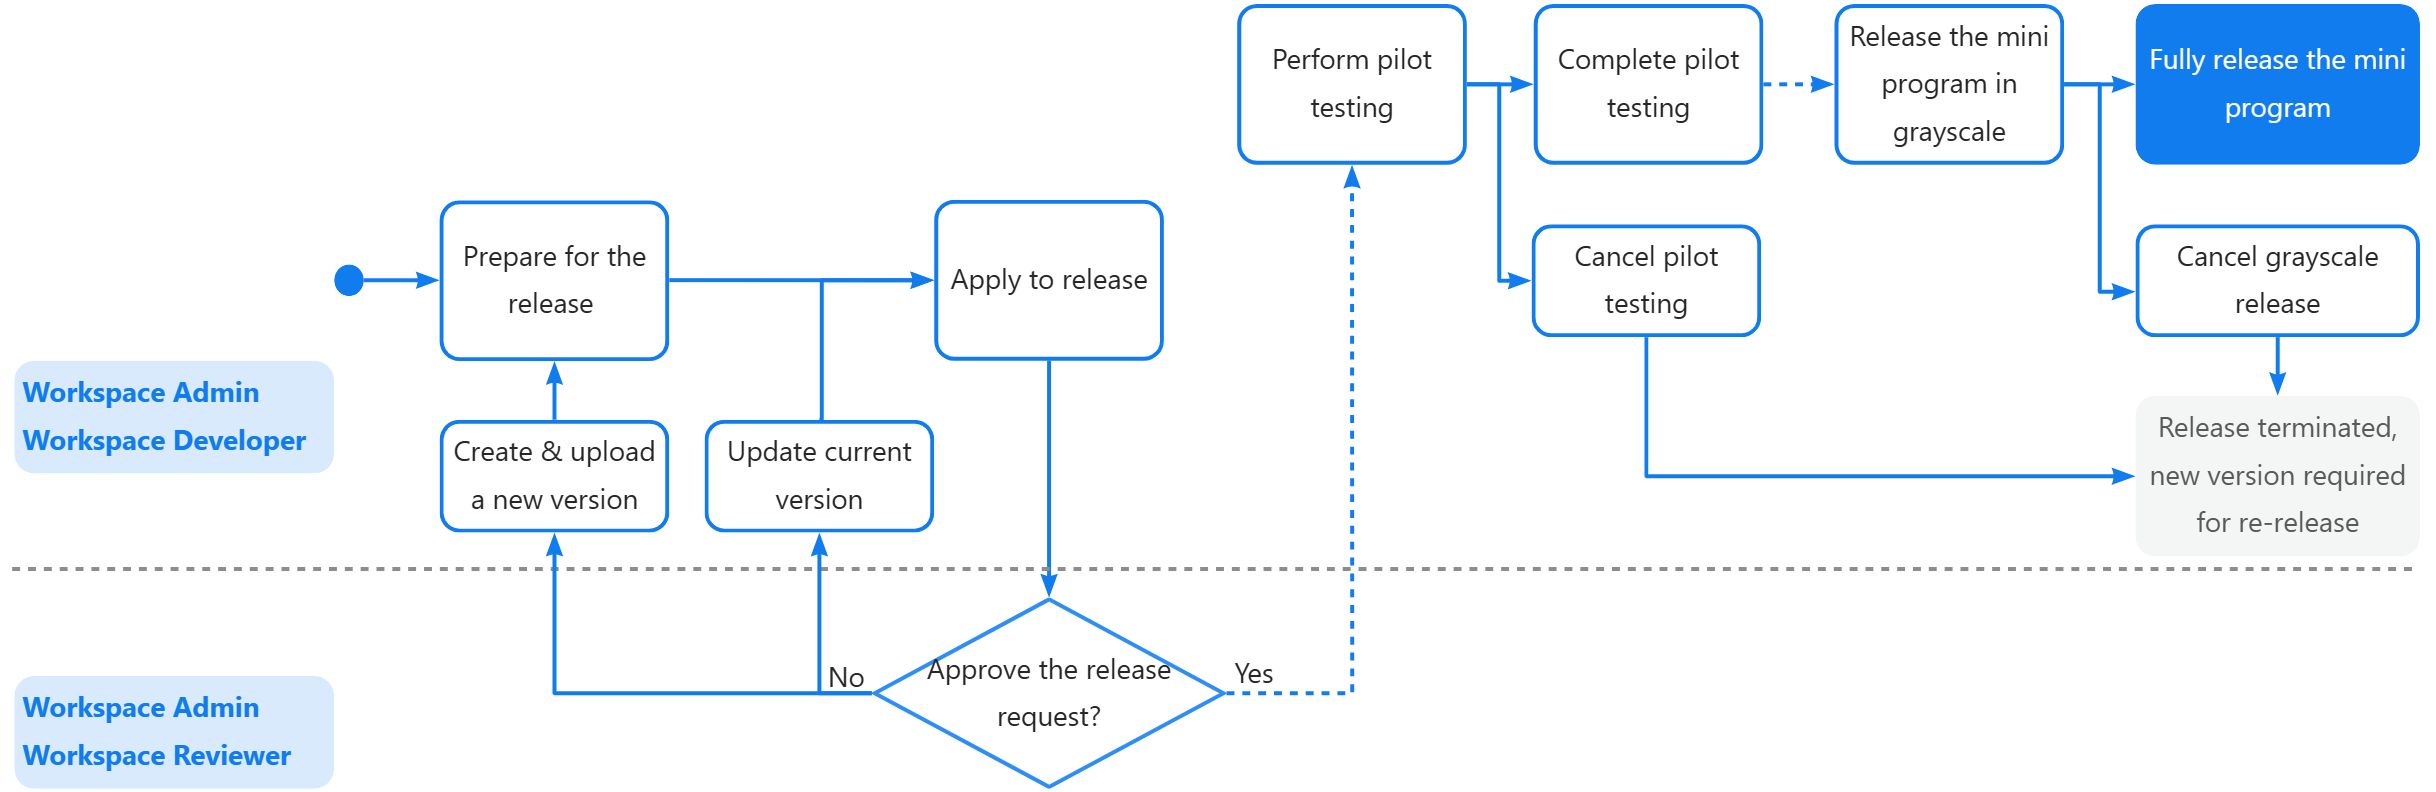
Mini-program release workflow for super apps
Before you begin
Before releasing the mini program, familiarize yourself with the following prerequisites:
- Access to release mini programs is role-based as follows:
- If you are in Tenant Workspace (on the super app side), your role must be Workspace Admin to operate all mini programs, or Workspace Developer to operate assigned mini programs.
- If you are in Developer Workspace (on the merchant side), your role must be Developer Admin to operate all mini programs, or Developer to operate assigned mini programs.
- Ensure that the mini-program version to be released has been successfully uploaded. For more information, refer to Upload mini programs.
Procedure
To release a mini program, take the following steps:
Step 1: Prepare for the release
To prepare for the release of a mini program, follow these steps to select the target app and set the release configurations:
- In the left navigation menu, click Mini Programs.
- In the mini program list that appears, find and click the mini program you want to release. Then, click the Versions tab.
- Locate the mini-program version you want to release and click Select App in the Actions column.

- In the dialog box that appears, click the Target App input field. The dropdown menu includes all available target apps that the mini program can be released to. Select an app and then select one of the following environments for the release:
- Production
- Sandbox
- Test
- Development
Note: You cannot release a mini program to the same environment repeatedly.
- (Optional) If you have not set global configuration for the mini program or need to override it for the current mini-program version, complete the fields that appear. For more information about these fields, refer to Set configurations. You can also update the configuration later in the next step.
- Carefully review your settings. The Target App field cannot be changed once saved. Then, click Select to save your changes.
Step 2: Apply to release
Mini-program releases require the super app's approval. To request the approval, follow these steps:
- Under the Versions tab, click
 (the plus sign) in front of the desired mini-program version. This shows a list of the target apps and corresponding environments that have been selected for release. In the Actions column, click Release.
 - On the Release Progress page that appears, it might take a few seconds for the platform to build the mini-program package and show the available operations.


Then, you can proceed with the release:
a. (Optional) Click View Configuration to update the configuration of the current mini-program version. For more information about the configuration fields, refer to Set configurations.
b. Click Apply to Release to submit a mini-program release request to the super app for review. On the dialog box that appears, carefully review the configuration of the current mini-program version, update its basic information as needed, and then click Apply. This changes Release Progress to Under Review.
Step 3: Check the request result
You can check the result of your mini-program release request in the following two places:
- The release progress page: Click View Details at the end of the most recent log.

- The inbox of your account email: The result is sent once the super app completes processing your request.
Mini Program Platform might change platform configurations based on business needs, which affects the necessity of pilot testing during mini-program releases. The next step depends on the request result and whether pilot testing is necessary:
- If the super app approves the request:
- If pilot testing is necessary, Release Progress changes to Pilot Testing and you can proceed to Step 4.

- If pilot testing is unnecessary, Release Progress changes to Release Preparation and you can proceed to Step 5.

- If the super app rejects the request, you need to fix the issues stated in the rejection reason. Based on the encountered issues, you might have the following options to fix them:
- Update the current version. You can edit the basic information and the configuration.
- Create and update a new version. Then, restart the release process from the beginning.
(Optional) Step 4: Perform pilot testing
Pilot testing enables you to give a selected group of users access to test your mini program. This process allows you to assess the performance of the mini program before making it publicly available. To perform pilot testing, follow these steps:
- Add testers
- On the Release Progress page, click Add Testers.

- Select either of the following options to provide a tester list:
- Add by Manual Entry: If you select this option, specify the testers by entering their super app user IDs in the input box.
- Add by File Upload: If you select this option, prepare and upload a CSV or TXT file that contains the super app user IDs of the testers.
- Click Add to save your changes.
Note: To test the mini program, testers need to take these steps:
- Open the app that is selected for the mini program release and log in to the account (identified by the specified super app user ID).
- Search for the mini program by name and open it.
- Explore the mini program and test its features.
- (Optional) Update test group
You can add testers during the test process. To make such changes, click Update Test Group, provide the updated list of super app user IDs in the corresponding field, and then click Update.
- End pilot testing
To end pilot testing, choose either of the following options based on the mini program's performance and your release intentions:
- If you want to cancel the release or improve the mini program for better performance, you can select Cancel Testing. This terminates both the pilot testing and the release process. To release the mini program again, you must create and upload a new version and restart the release process from the beginning.
- If you are confident about the mini program's performance and stability, click Complete Testing. This changes Release Progress to Grayscale Release, allowing you to release the mini program and make it available to app users.
(Optional) Step 5: Release the mini program in grayscale
If you want to gather feedback on the current mini-program version before full release, you can release the new version in grayscale to gradually make it available to all app users. To release in grayscale, follow these steps:
- On the Release Progress page, select Grayscale Release as the release type and click Confirm.

- In the Grayscale field, select the percentage of app users who can access the new version and click Next Step.
- Based on user feedback, you can choose either of the following options to conclude the grayscale release:
- If user feedback is positive, you can select a higher percentage to allow more app users to use your mini-program until you release it to 100%, marking the full release to all app users.
- If user feedback is negative, you can cancel the grayscale release. In this case, to release the mini-program again, you must create a new version and restart the release process from the beginning.
Step 6: Fully release the mini program
To fully release the mini program to all app users, take actions based on whether you make a grayscale release:
- If you make a grayscale release (Step 5), on the Release Progress page, select
100%in the Grayscale field and click Next Step. - If you do not make a grayscale release, on the Release Progress page, select Full Release as the release type and click Confirm.